
Caparison Owner's Manual
We recommend that you take the time to read this manual and familiarise yourself with your Caparison guitar and it’s features. In order to keep the instrument in the best possible condition and ensure the best playability, please follow the advice given for care, adjustment and correct usage.
We would always advise that any major setup adjustments be carried out by an experienced and qualified guitar technician. If you are unsure of what you are doing, please seek the help an experienced and qualified guitar technician in order to avoid possible irreparable damage to the guitar.
Advisory Information.
Be careful when using this instrument outdoors, especially in bad weather. Protect a guitar from damp conditions and avoid handling the instrument with wet hands. There is a risk of electric shock from the power supply of any connected electrical device, such as an amplifier or effects unit, if not properly earthed / grounded.
DO NOT expose the instrument to naked flame or sources of extreme heat. The instrument is made from some combustible materials.
DO NOT attempt to puncture or burn used batteries (only applies to guitars with batteries). Used batteries should be disposed of correctly.
Ensure that you only use cleaning products that are intended for use on a guitar/bass.
Ensure that you store your guitar/bass in a suitable environment.
We recommend that you use a suitable gauge of strings for your tuning, stings can break easily if put under higher tension than intended.
Please be aware that a tremolo equipped guitar incorporates very strong springs to secure the bridge and counteract string tension. Ensure that you compensate for this tension when changing strings or making adjustments.
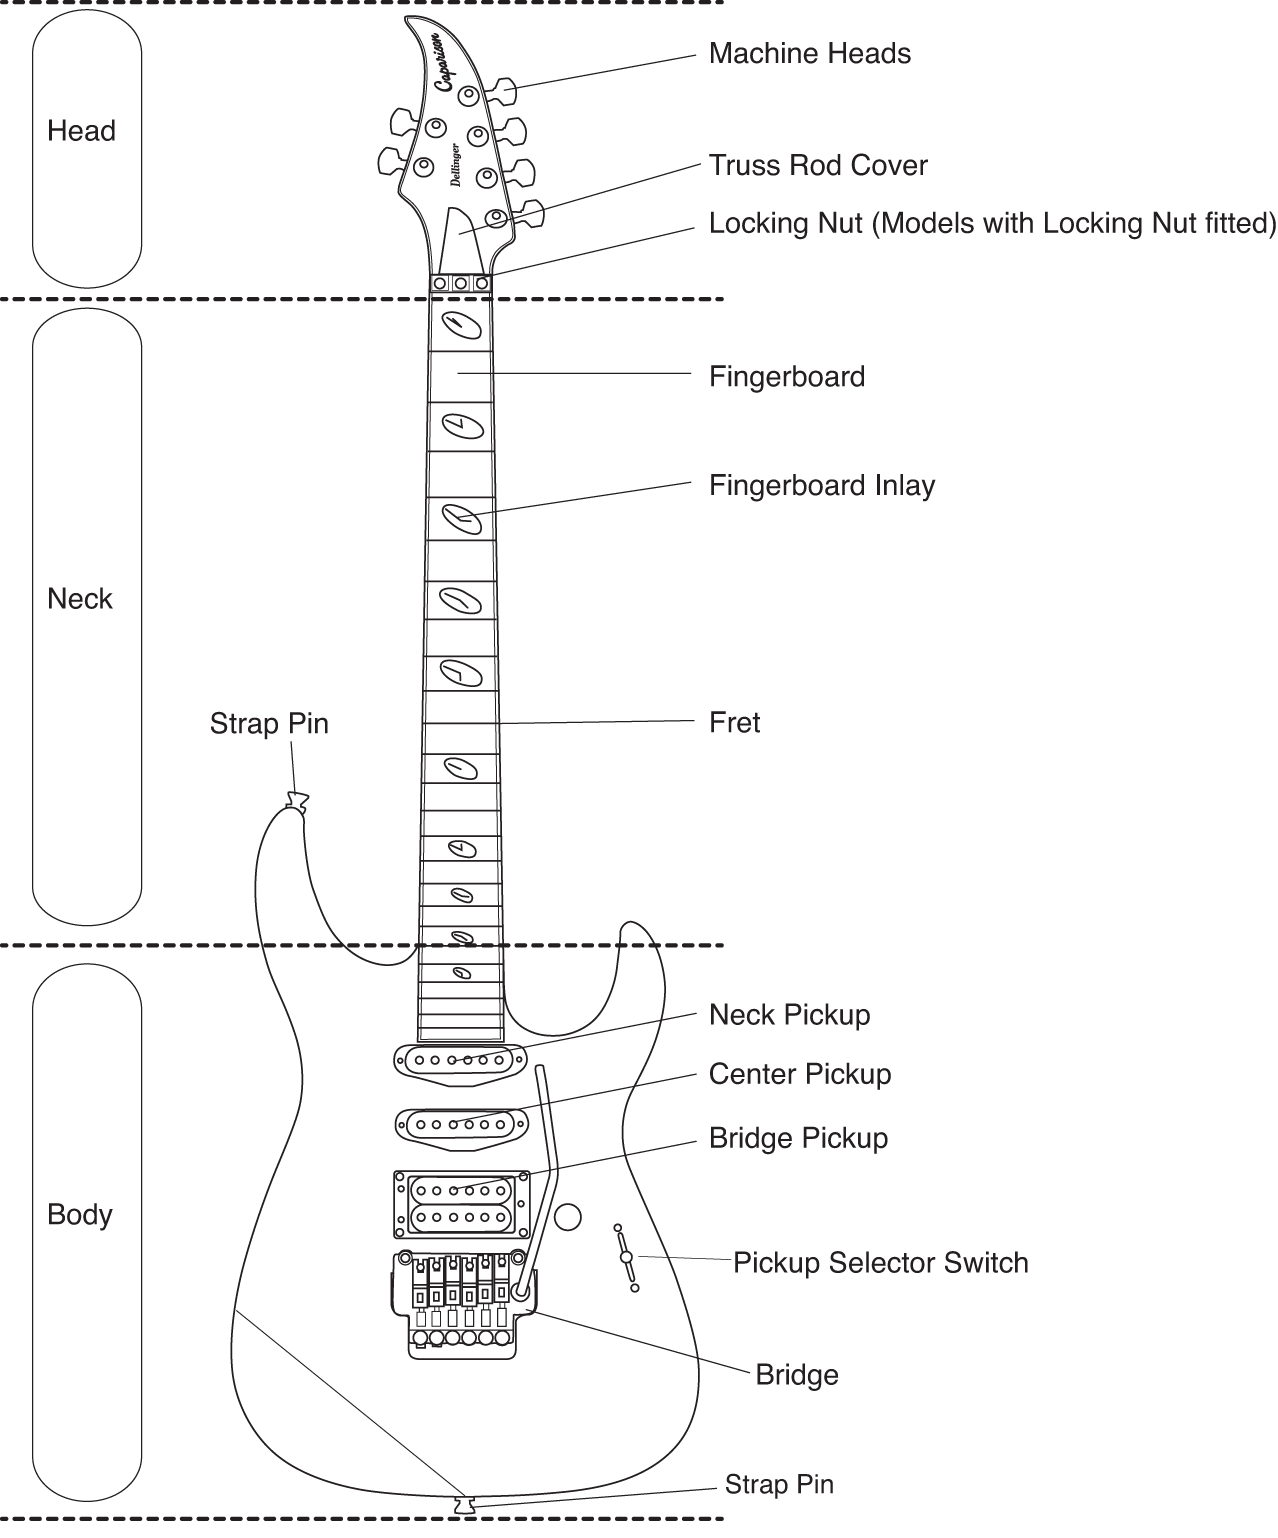
Caparison Body Construction
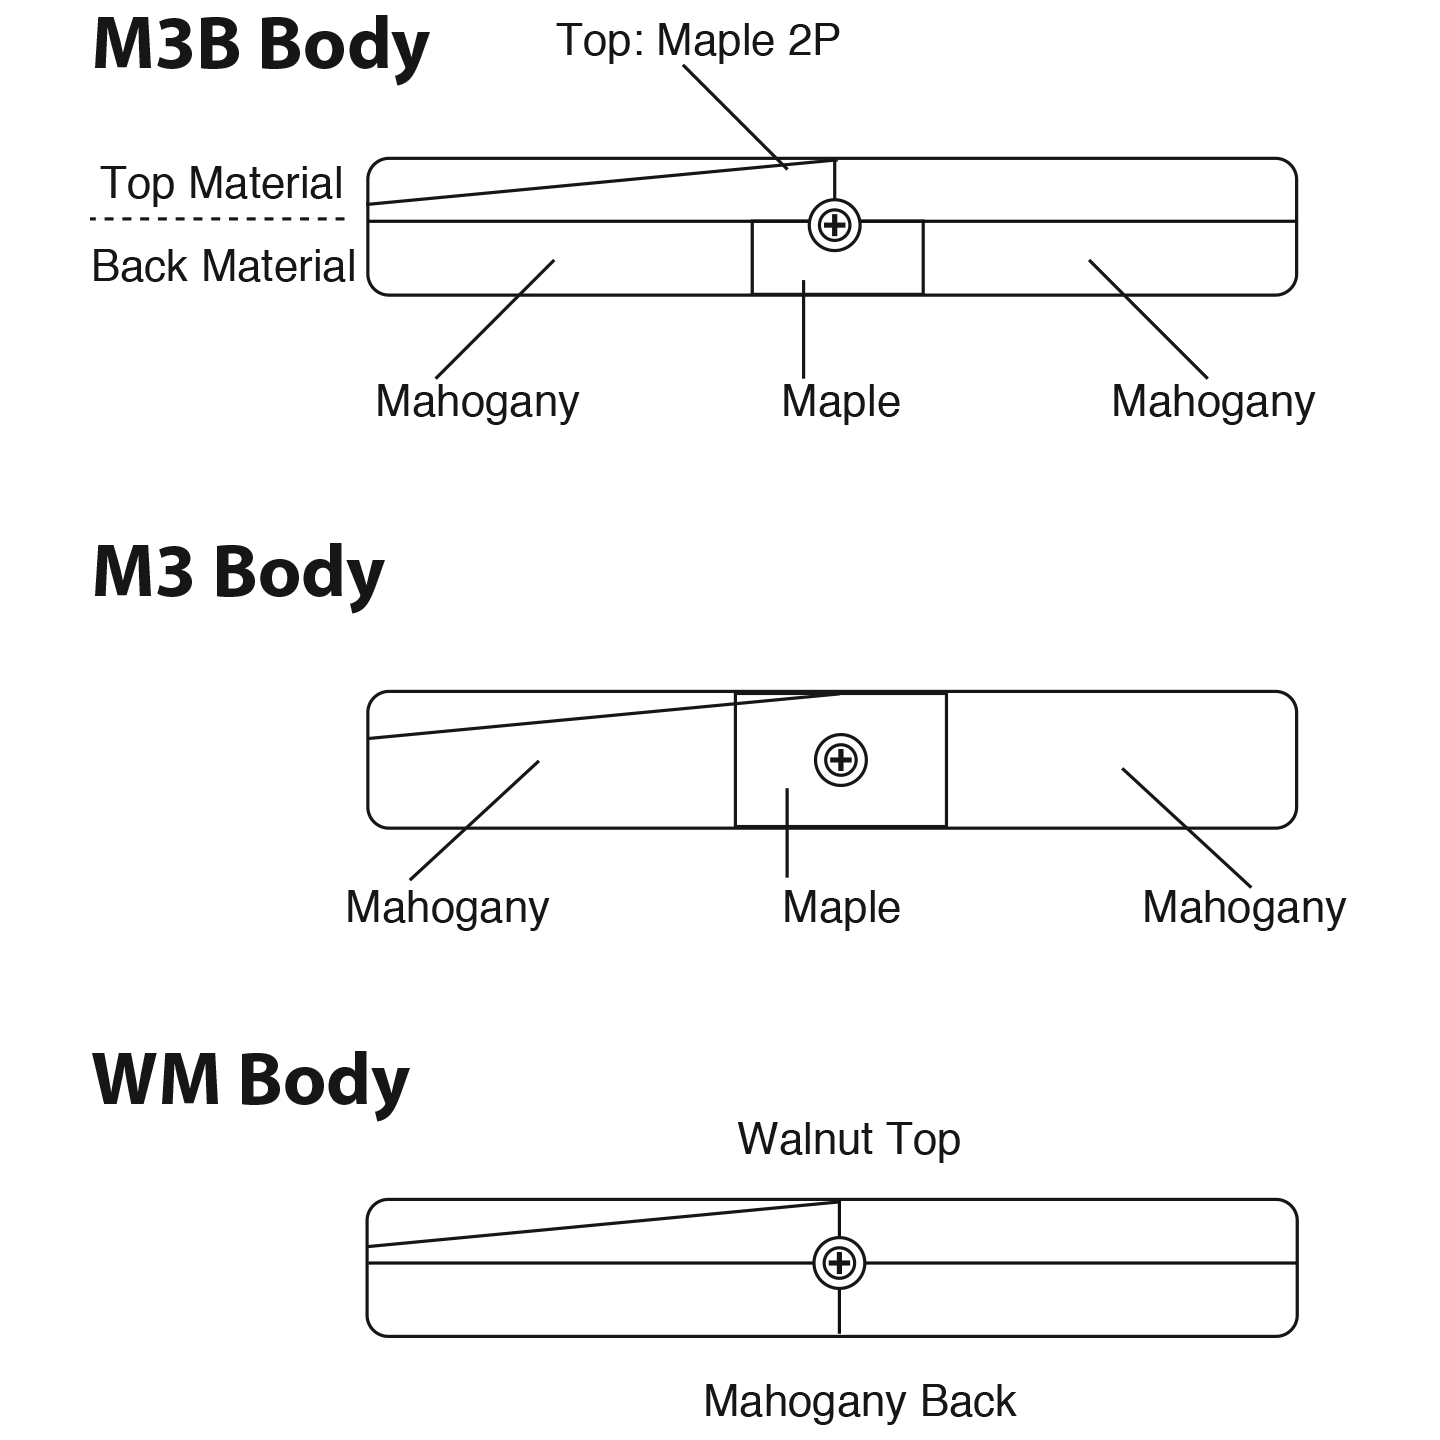
M3B Construction
The Caparison M3B construction consists of a central Maple section sandwiched between two Mahogany sides with 2-Piece Maple top.
M3 Construction
The M3 construction consists of a central Maple section sandwiched between two Mahogany sides with the neck bolted directly to the Maple section.The result is a balanced sound with rich sustain.
WM Construction
The ‘WM’ (Walnut Mahogany) construction consists of a Walnut top and Mahogany back producing a balanced sound throughout the frequency range.
Care & Maintenance
Humidity
The ideal humidity for a guitar is about 45% – 55%. This is roughly the same level as is comfortable for a human being, so if you are comfortable so is your guitar.
Damp
Do not leave your guitar in excessively damp environments. This can warp the neck and cause problems with the electronics.
Dryness
An excessively dry environment can dry out the woods and cause shrinkage. The results of this can include cracks in the fingerboard and the guitarsʼ finish. In extreme cases dryness can cause the fret ends to protrude from the edge of the fingerboard, and if the fingerboard has binding this may also crack.
Temperature
Take care when taking your guitar into an environment with a sudden temperature change, the room temperature may be considerably different from that inside the guitar case. If possible keep the guitar in its case for a little while for the guitar to acclimatise to the outside temperature. That will help keep the tuning stable and prevent neck movement or cracks and other damage.
Direct sunlight
As well as drying out the guitar be aware that direct sunlight can cause the finish on the guitar to discolour.
Heat sources
Avoid leaving your guitar next to radiators or any other heating devices, this can lead the wood to dry out and can cause cracks and other damage.
Guitar Storage
As a general rule the best place to keep your guitar is in its case. This provides excellent protection against temperature, humidity and physical damage. Do not expose the guitar to any climate conditions or heat and humidity that you would not want to be exposed to yourself! Keep your guitar in tune and with a full set of strings on it as this will keep the neck in tension.
Keep your guitar / bass clean
If you do not clean your strings then they will quickly become dull and even begin to rust. Dirty strings also damage the frets themselves because the grime and rust makes the strings coarser. There are many types of string cleaners and for the most part, they are intended to be used after each playing session. Also wipe down the neck and remove any moisture from the guitar body, pickups etc. This will help prevent dirt build up and also help reduce any rusting on screws, pickups etc.
Cleaning Ebony Fingerboards
Ebony fingerboards should be cleaned with a quality cleaning cloth. They do not necessarily require oil, although a lemon oil or fingerboard cleaning oil can be used.
Cleaning the Matt Finish Bodies, Necks & Maple Fingerboards
Remove any excessive dirt build up by using a good quality pencil eraser. Do not use regular luster guitar polish as this can irreparably damage the matt finish. *The FX-AM models, Dellinger-JSM and all models from November 2018 have Urathane Matt finished necks, and Urathane Matt finished Maple Fingerboards.
Cleaning Oil Finish Necks and Unfinished Maple Fingerboards (some models up to November 2018)
For light dirt build up, remove by using a good quality pencil eraser. More excessive dirt build up can be removed by using an Extra Fine sand paper (no coarser than a P600). After that, once the fingerboard is clean, wipe the entire surface with a good quality furniture oil (or gun stock oil) on a dampened cloth to seal it. The oil that is left behind will replenish the oil lost from the surface of the wood and help retard further losses. Use as little as possible; you only want to put a slight gloss on the surface, and only clean once or twice per year. Avoid using any silicones or waxes. *Not applicable to models produced after November 2018.
Maintaining the Electronics
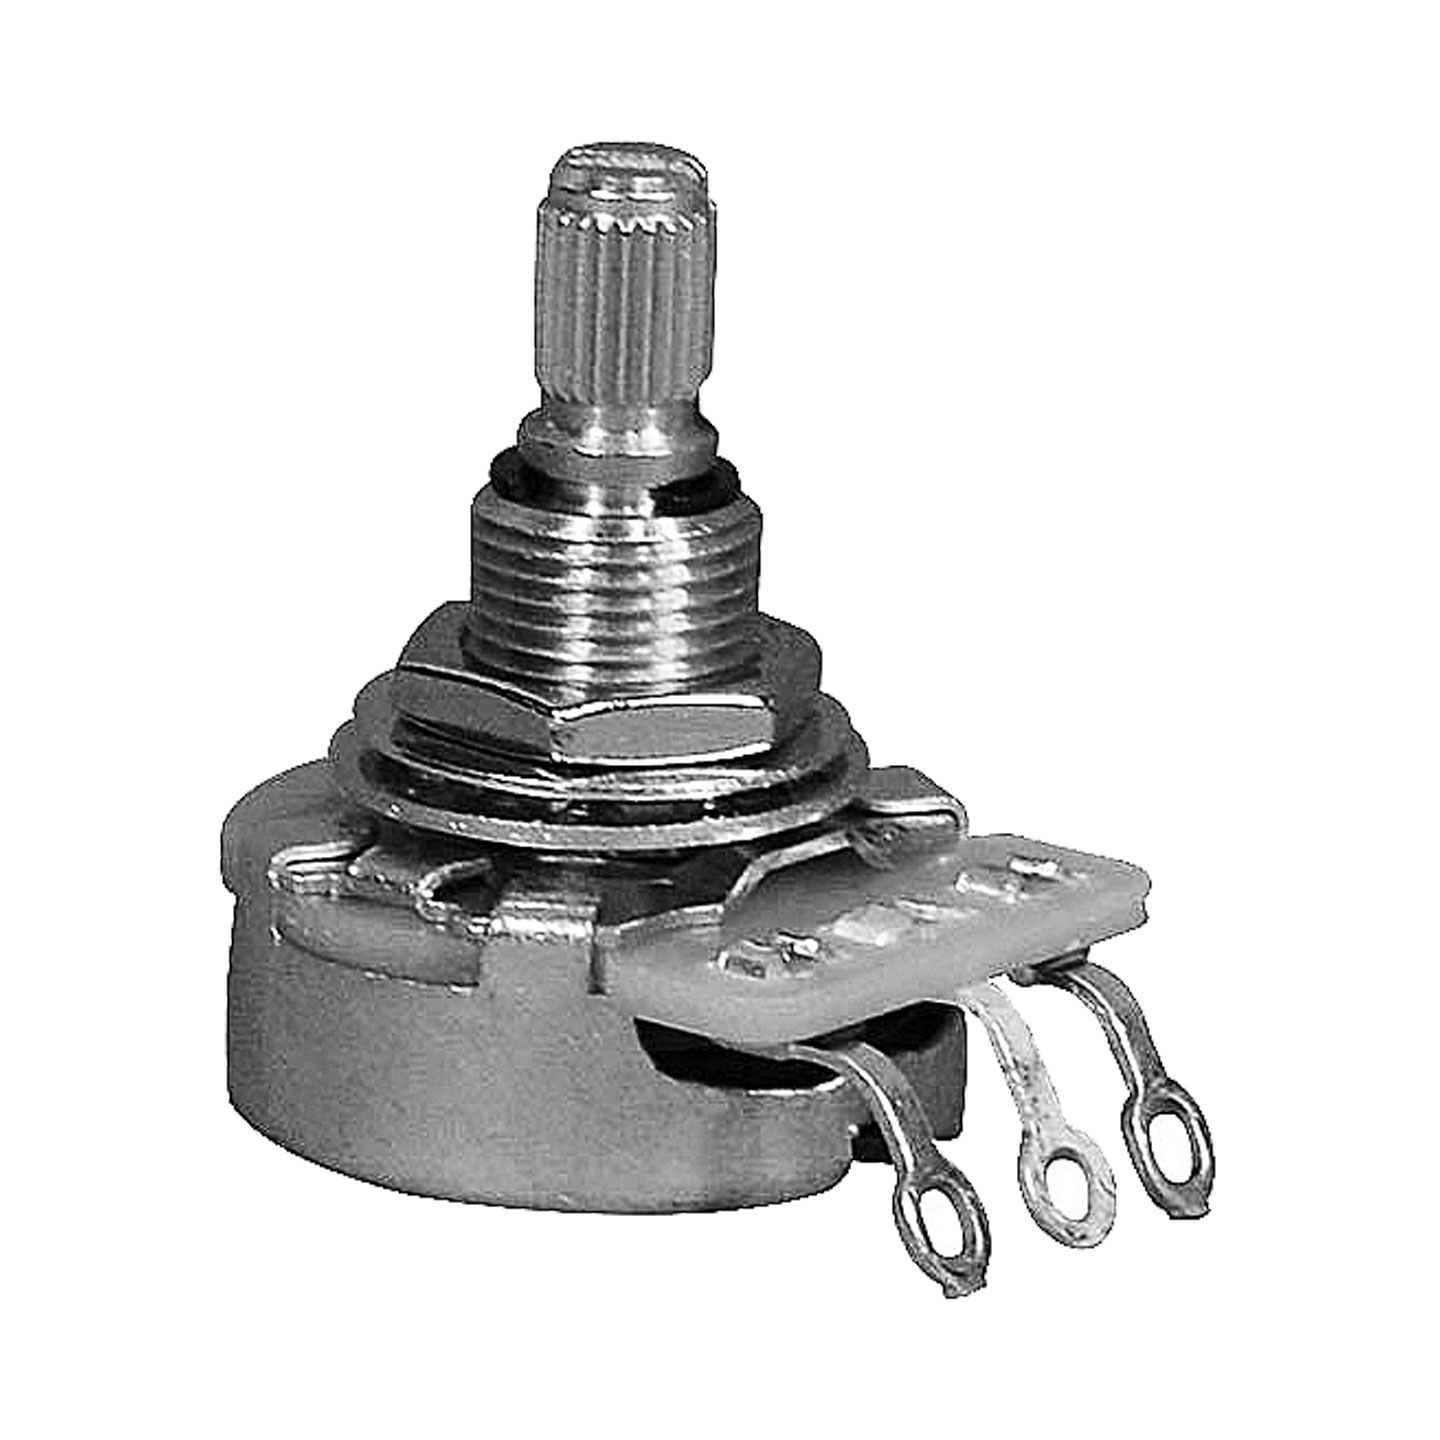
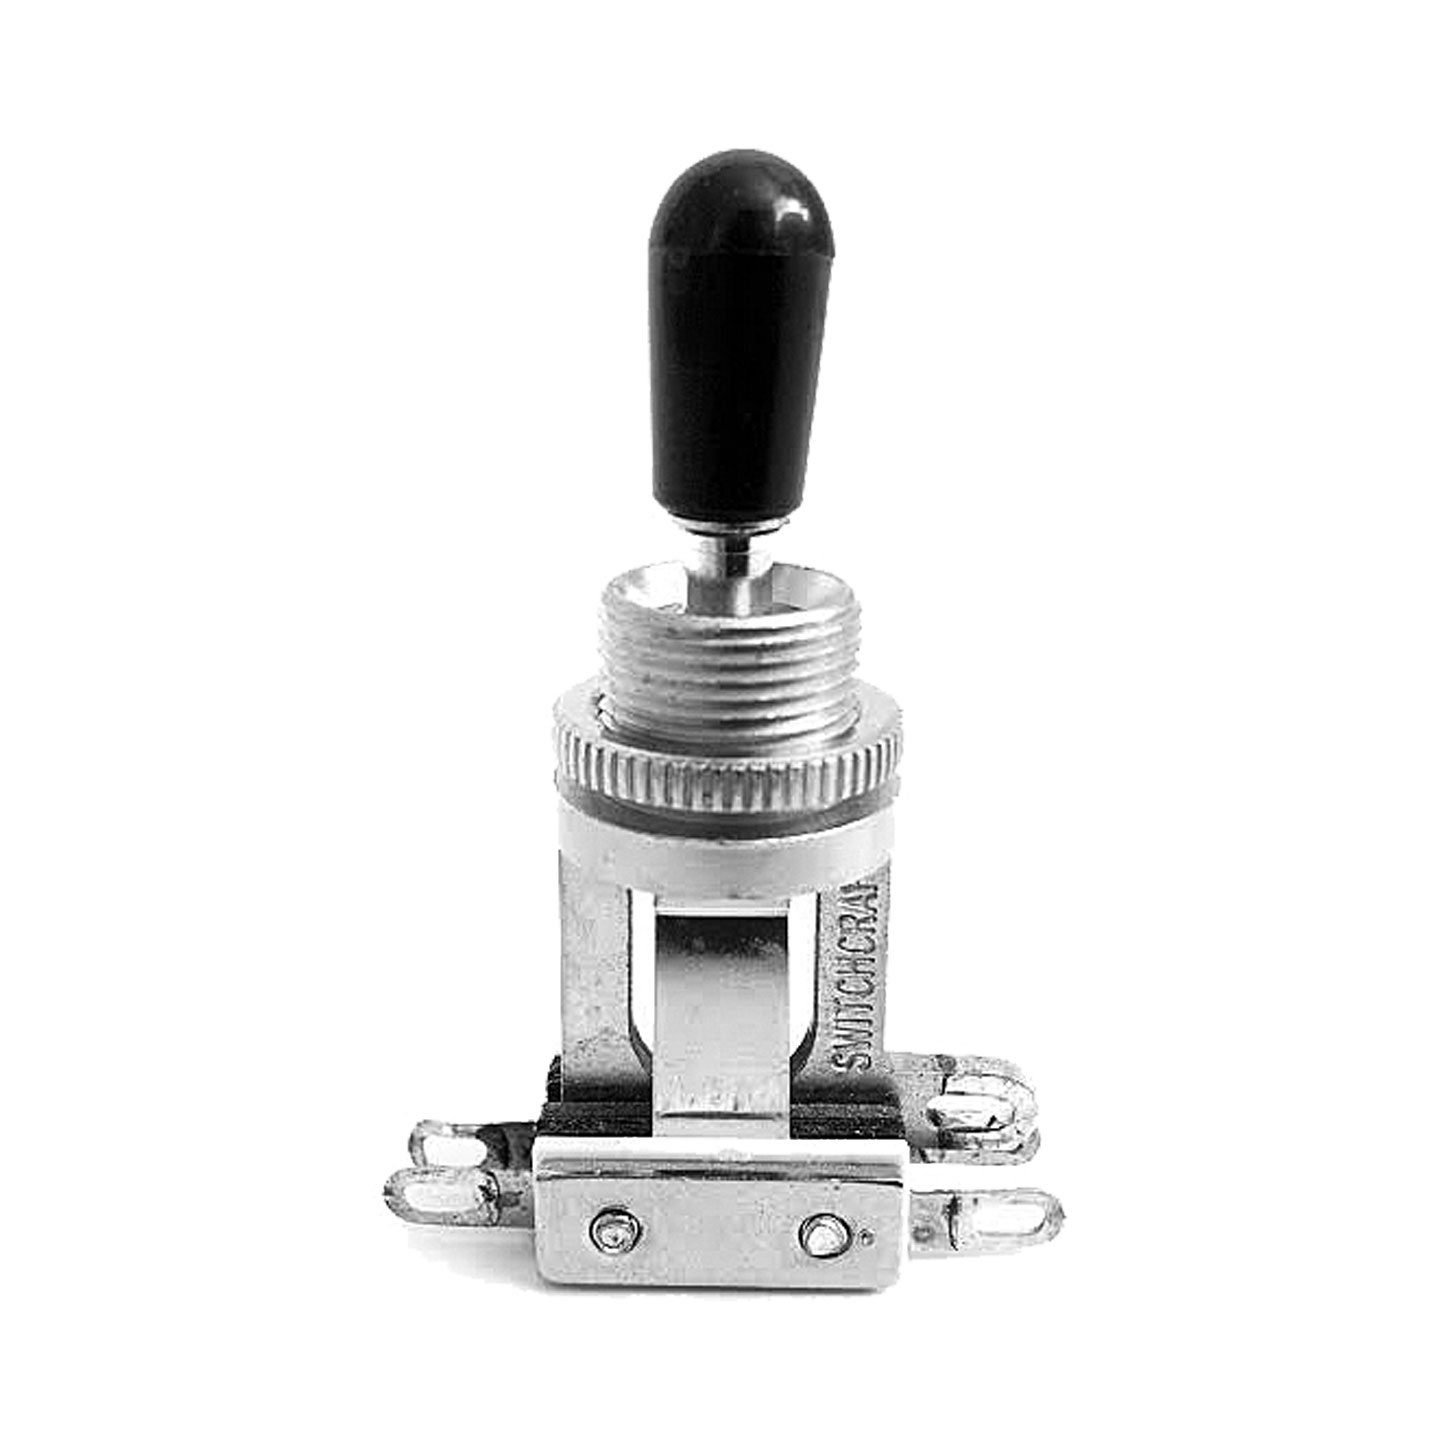
Dust and dirt can get stuck in the contact points of the ‘Volume Pot’, ‘Input Jack’, ‘Pickup Selector Switch’ and other Switches through long term use. This can cause them to sound ‘Scratchy’ when the component is used. Some-times just turning the pot or working the switch back and forth a few times is sufficient to clear the connection and remove the unwanted noise. If this has not worked then use a switch cleaner (contact cleaner) to remove any dirt or dust. If the switch cleaner has not been effective in removing the ‘scratchy’ noises from the switches or pots then it might be time to replace them.
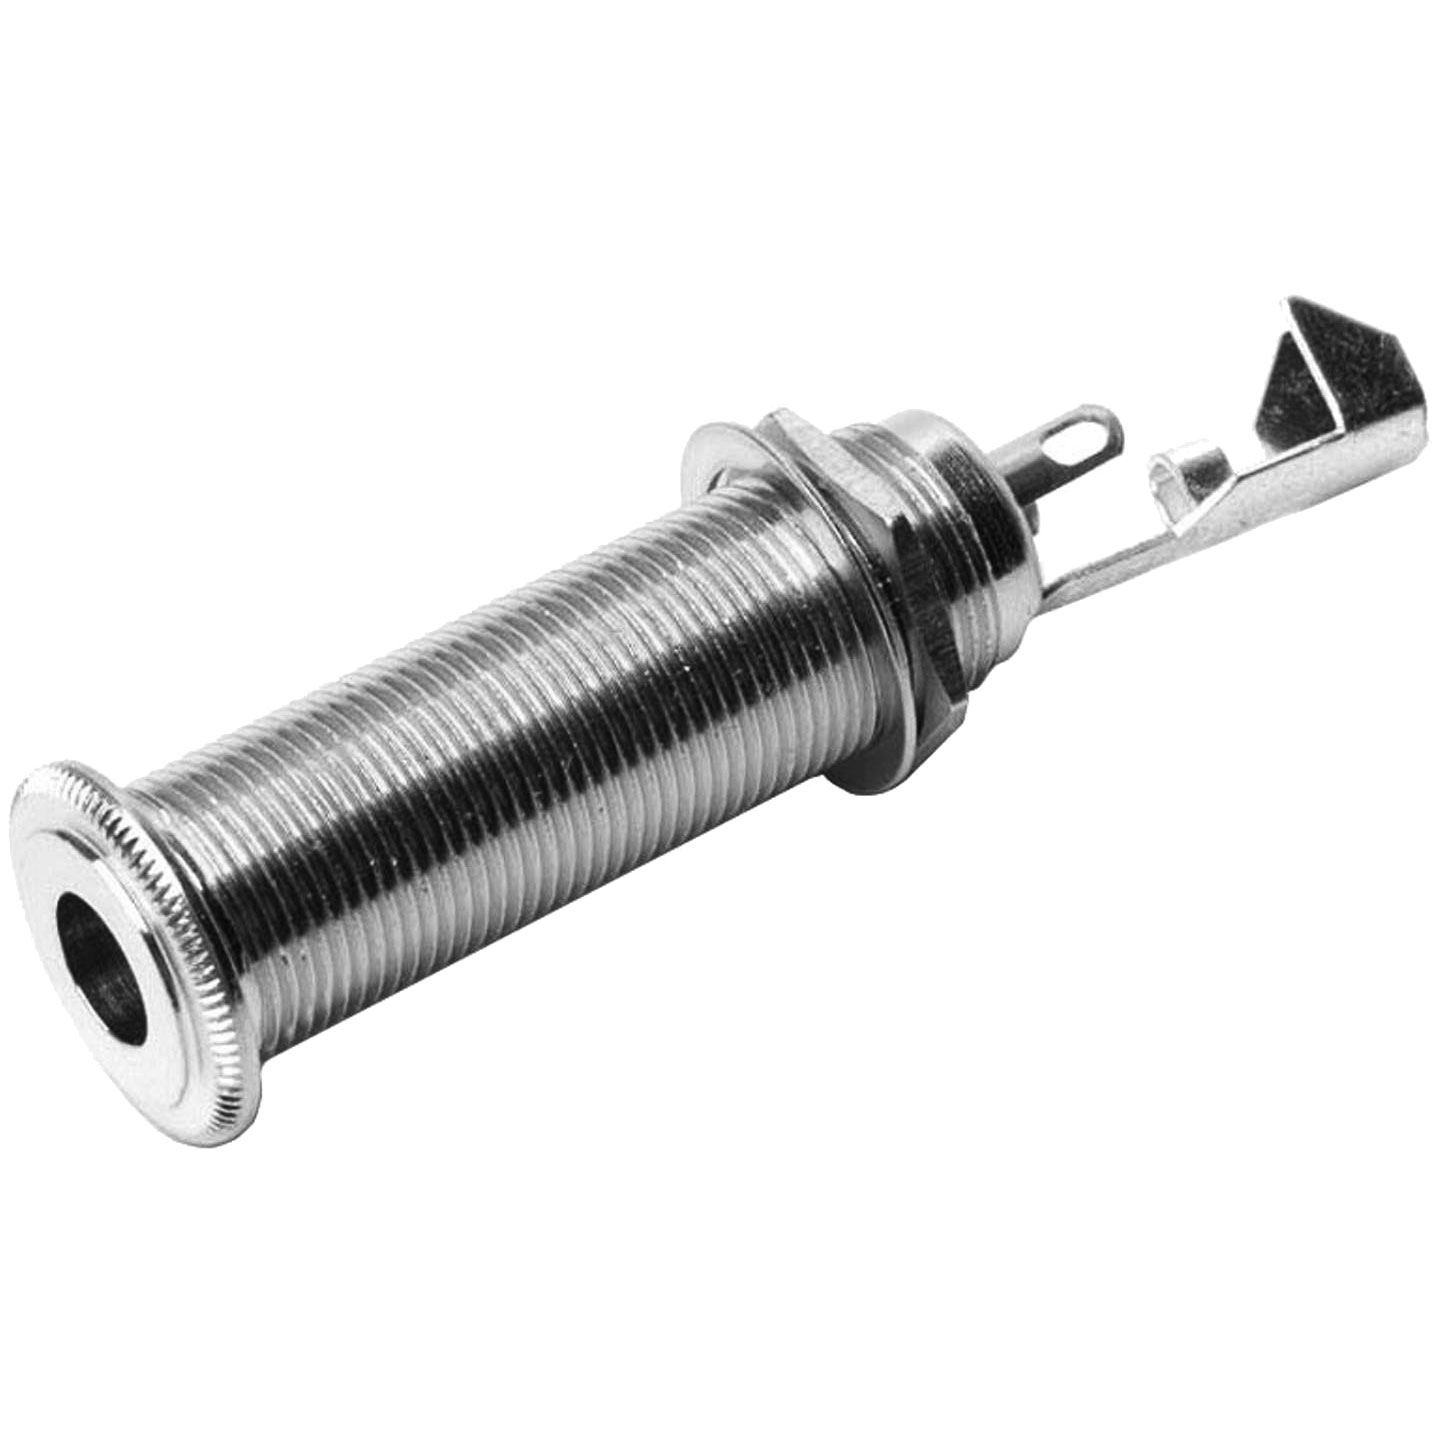
Input Jack

Neck, String & Pickup Adjustment
Changing Strings
If your strings are sounding dull and keeping them in tune has become difficult then they may need replacing. If this is the case then it is preferable to replace all the strings at the same time. If you are changing the gauge of your strings or altering the tuning of your guitar then the bridge settings may also need adjusting. To do this please refer to the page with details of the particular bridge fitted to your guitar.
Tuning
It is always best to precisely tune the guitar by using a dedicated guitar tuner. This will avoid over tuning the guitar, which can lead to string breakage.
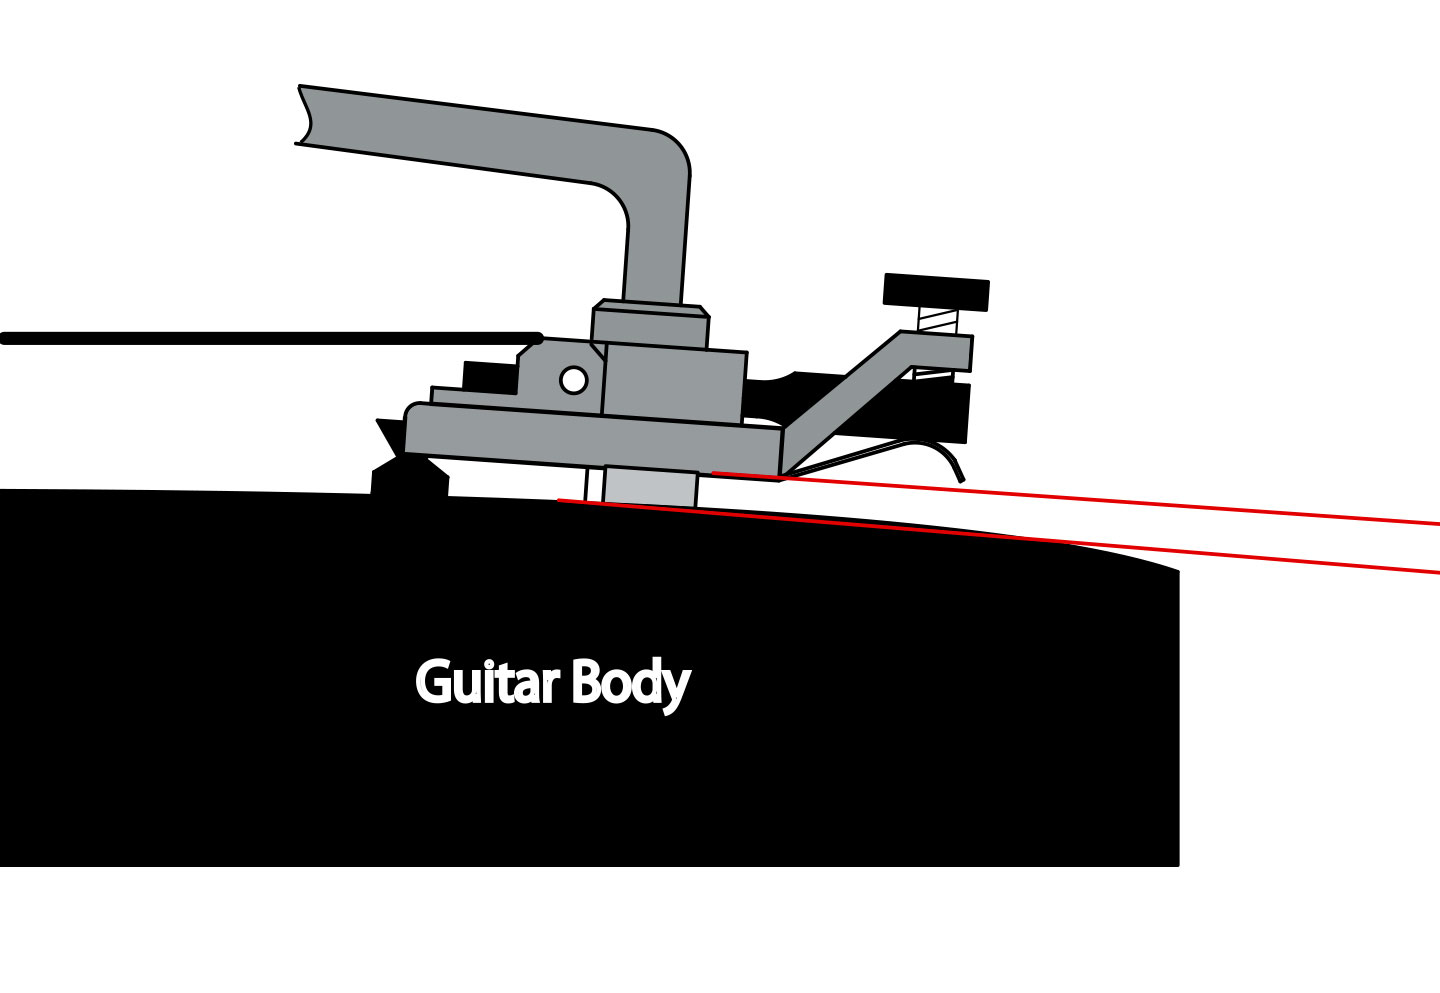
Adjusting the Action of the Guitar
The ‘Action’ of a guitar is the distance between the string and the fret. All Caparison Guitars are shipped with what we consider to be the best action for each model. Your style of playing, changing string gauge or the tuning of your guitar however may necessitate the need to alter the height of the strings. This can be done by raising or lowering the height of the bridge saddles. Please refer to the page with details of the particular bridge fitted to your guitar on how to do this. In some circumstances the truss rod in the neck may also need adjusting to negate any ‘buzz’ incurred by lowering the action of the strings (please refer to the section on ‘Neck Adjustments’ for instructions on how to do this)
Adjusting the Intonation
Adjusting the intonation is usually necessary when fitting different strings to your instrument, it can also be affected by the angle of your tremolo system. Intonation is adjusted by moving the string saddles either forward or backwards (to do this please refer to the page with details of the particular bridge fitted to your guitar). Make sure the guitar is in tune using an electronic tuner. Next play a harmonic on the 12th fret and compare that to the fretted note played on the 12th fret. If the intonation is correct then both notes should read the same on the tuner. If the 12th fret harmonic is sharp then the saddle needs to be moved forward, if it is showing flat then it needs to be moved back.
Neck Adjustments
The truss rod set inside the neck and is there to keep it in balance when the neck is under tension. Sometimes changes in humidity, climatic changes, different string gauges or tunings may require an adjustment of the truss rod in order to maintain a perfect string action. Adjust the truss rod 1/4 turn at a time and then check the neck relief again before making any further adjustment.
Please note we would always advise that any Truss rod adjustments be carried out by an experienced and qualified guitar technician as excessive adjustments may cause irreparable damage to the neck.
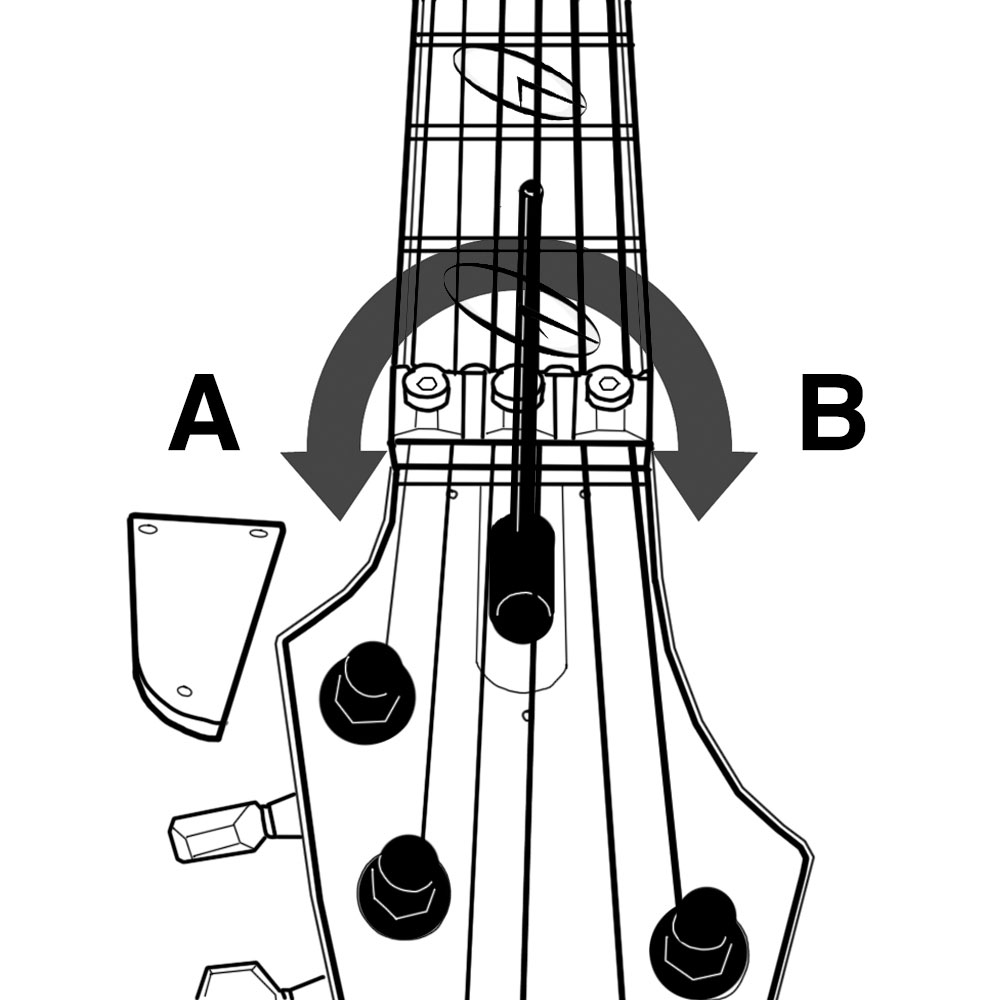
- To access the truss rod remove the truss rod cover on the headstock.
- Adjust the truss rod by using the supplied wrench.
- To loosen the truss rod turn the wrench anti-clockwise (A).
- To tighten the truss rod turn the wrench clockwise (B).
Pickup Height Adjustment
Adjusting the height of the pickups will alter the dynamics of the sound of your guitar. This is, of course, down to personal taste and your Caparison is supplied with the pickups adjusted to what we believe is their optimum height. To adjust the pickup height use the small screws either side of the pickup to either raise or lower them. As a general rule raising the height of the pickup will give you a louder, punchy and brighter sound but may have an adverse effect on your sustain. While lowering them will give you a smoother, warmer tone with a more dynamic range.
Schaller S-FRT II

Tremolo Components
To remove strings
- Loosen ‘Nut Clamping Screws’ with a 3.00mm Allen Key (hex key) to unlock the strings.
- Turn the ‘machine head’ to loosen the strings and remove from the machine heads.
- Loosen the ‘String Lock Screw’* with a 3.00mm Allen Key (hex key) and remove string from the ‘String Lock Insert’.
*Please note that when the strings are locked into place the normal machine head tuners cannot be used.
Fitting new strings
- Remove the ball end of the new string with a wire cutter. Then insert that string between ‘Bridge Saddle’ and ‘String Lock Insert’.
- Tighten the ‘String Lock Screw’ with the 3.00mm Allen Key (hex key) to lock the string in place. Be careful not to over-tighten the ‘String Lock Screw’ as it may cause damage.
- Pass the string between the ‘Nut Baseplate’ and the ‘Nut Clamping Block’.
- Wind the strings through the Machine Heads, and tune as normal. Because of the floating bridge, you may have to re-tune the strings several times before they stabilise.
- Once all of the strings are in tune, tighten the ‘Nut Clamping Screws’ to lock the strings in place, be careful not to over-tighten the ‘Nut Clamping Screws’ as it may cause damage.
- Again, check the tuning, any adjustments can be done by using the ‘Fine Tuning Screws’ on the bridge.
Adjusting the Intonation
- Loosen the ‘Nut Clamping Screws’ with a 3.00mm Allen Key (hex key) to unlock the strings. Use the Machine Head to loosen the string.
- Loosen the ‘Saddle Mount Screw’ with a 2.50mm Allen Key (hex key) to unlock the ‘Bridge Saddle’. Only loosen the screw enough to move the saddle.
- Move the ‘Bridge Saddle’ forwards or backwards to the correct position and lock the saddle back into place using the 2.50mm Allen Key (hex key).
- Tune the string and re-check the intonation**. If it is still not correct then repeat step 3.
- When the intonation is correct lock the strings into place using the ‘Nut Clamping Screws’.
**See the ‘Neck, String and Pickup Adjustment’ section for instructions on how to set your intonation.
Adjusting the height of the strings
Turn two Bridge ‘Pivot Studs’ with a 3.00mm Allen Key (hex key) to raise or lower the height of the bridge. Adjust each ‘Pivot Stud’ a little at a time and check your tuning between each adjustment.
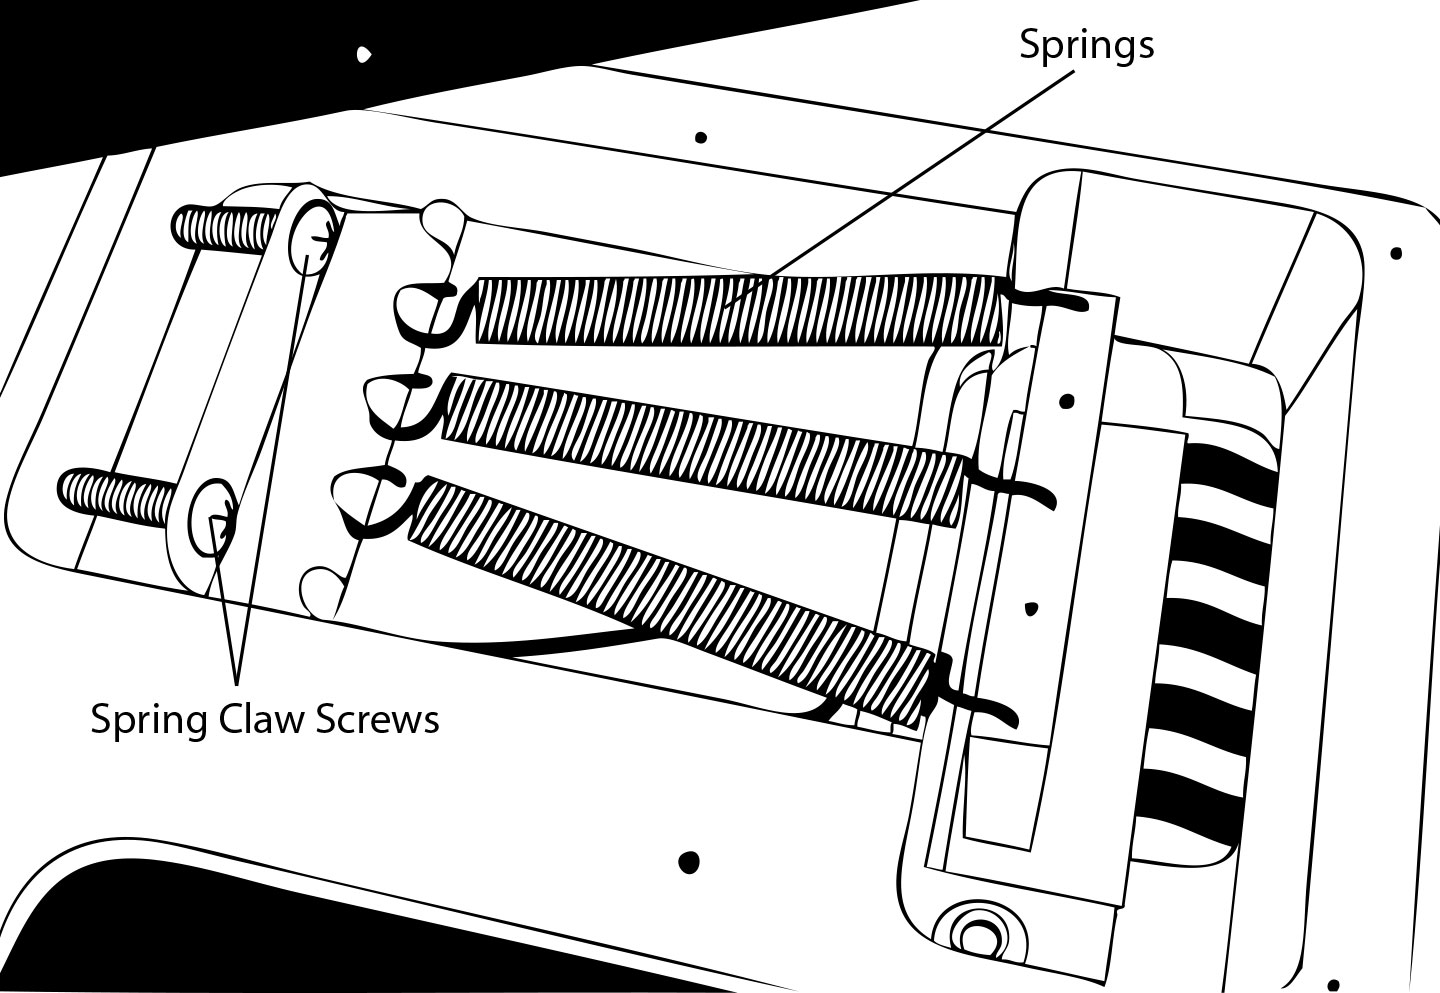
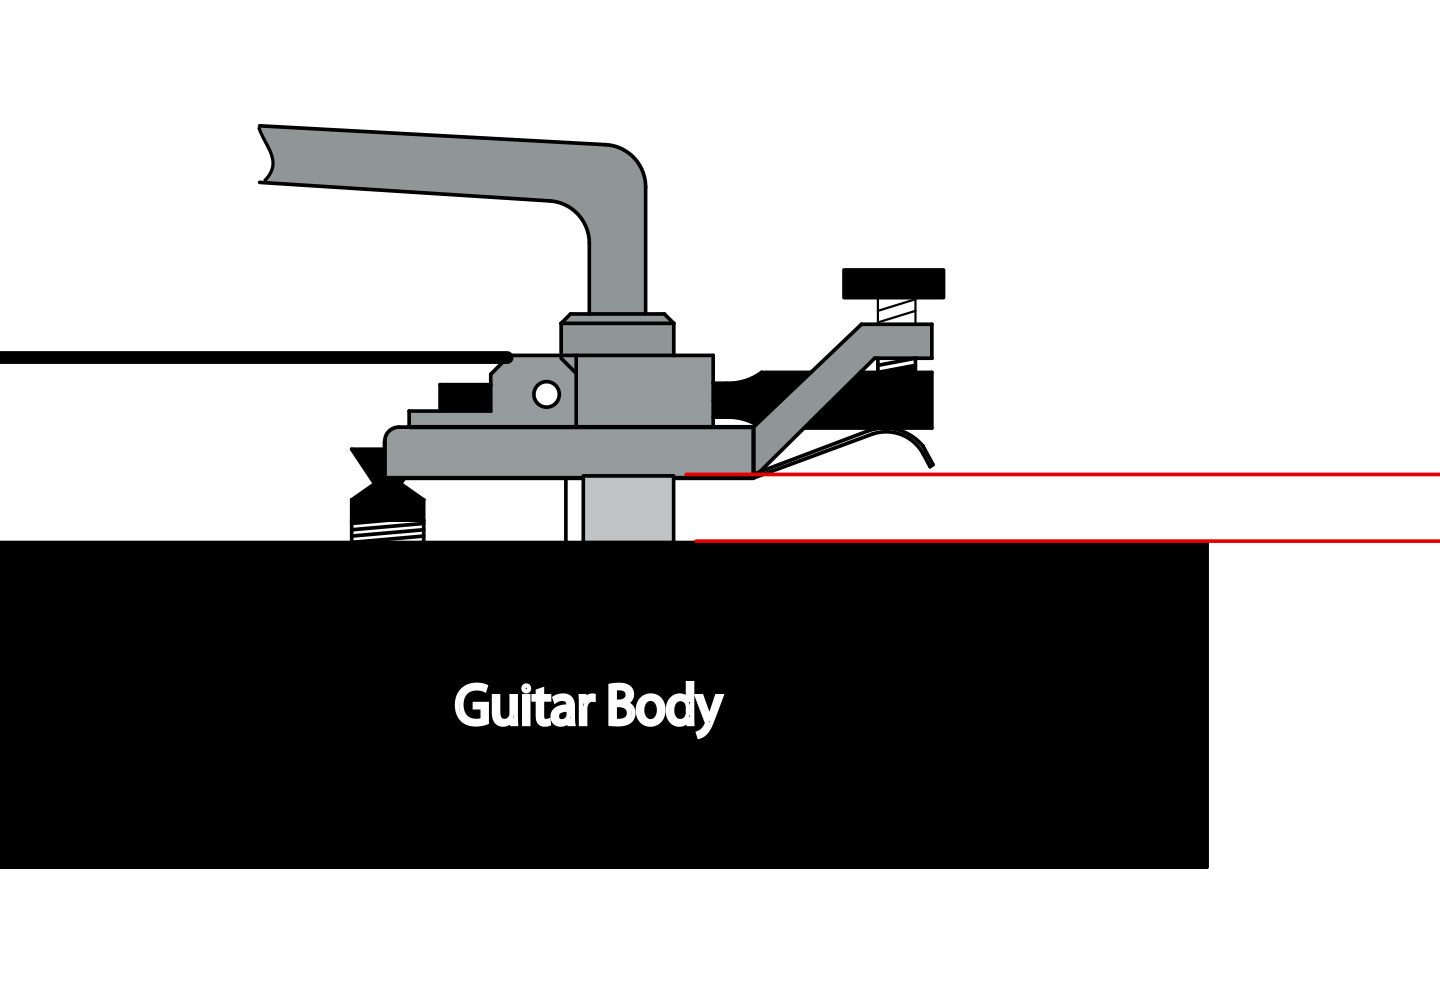
Adjusting the Floating Bridge
The bridge should always sit parallel to the surface of the guitar body. If you change string gauge or use a different tuning the bridge may need adjusting.
- Remove the spring cover panel on the back of the guitar.
- Turn the two ‘Spring Claw Screws’ with a Phillips head Screw driver to adjust the length of the spring (the springs keep the tension of the bridge in balance with the strings). Adjust the two ‘Spring Claw Screws’ a little at a time and continue to check the tuning until the bridge becomes balanced.
Caparison Fixed Bridge
To remove the strings
- Loosen the strings and remove from the machine heads (use a wire cutter to remove any ‘windings’ at the top of the string).
- Pull out the strings through the string ferrules on the back of body.
Fitting new strings
- Insert the new string into the string ferrule on the back of body, and pull it through the ‘Bridge Saddle’.
- Ensure the string is seated correctly on the ‘Bridge Saddle’, insert the string into the Machine Head Post, and tune as normal (see Gotoh MG-T and Hipshot Grip-Lock Machine Head instructions).
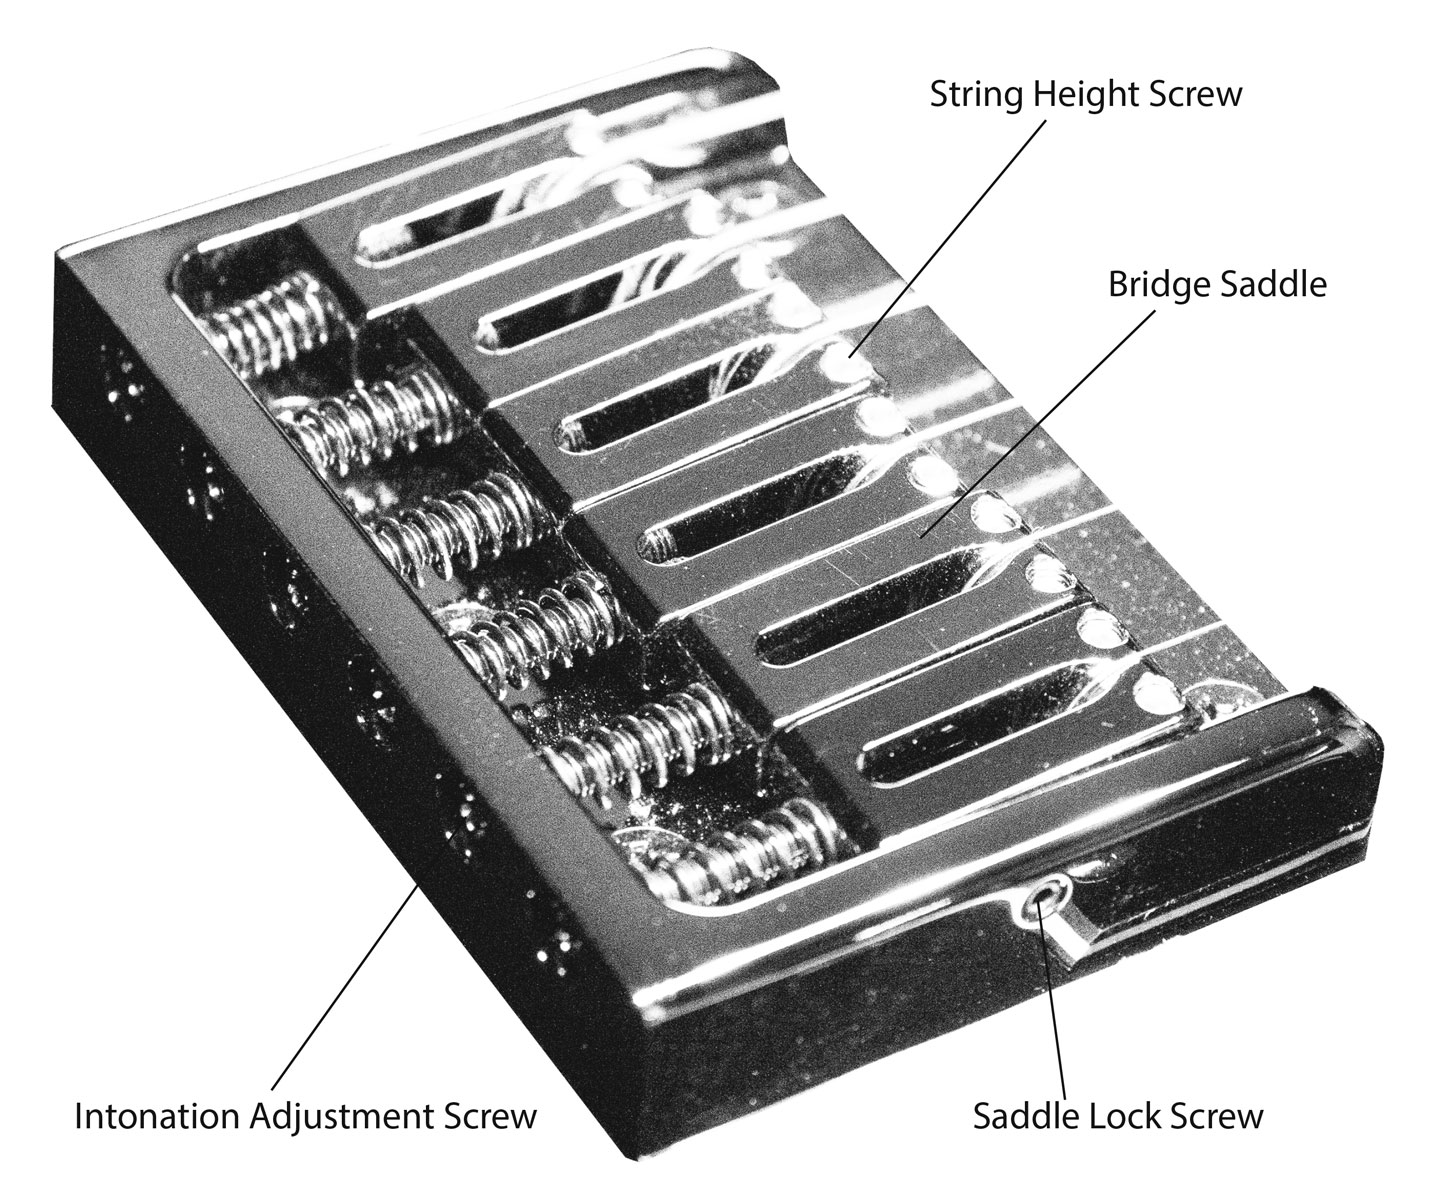
Intonation Adjustment
- Turn the ’Saddle lock Screw’ on the side of the bridge with an Allen Key (hex key) (1.5mm), to release the lock.
- Turn the ‘Intonation Adjust Screw’ with a screw driver, in order to move the saddles forward or backwards to adjust the intonation*.
- Check the tuning, and once all of the strings are at the correct intonation lock the saddles into place using the ‘Saddle lock Screw’.
To Adjust the String Height
- Turn the ‘Saddle Lock Screw’ with an Allen Key (hex key) (1.5mm) to release the lock.
- Turn two ‘String High Adjust Screws’ with an Allen Key (hex key) (1.5mm), to raise or lower the ‘Bridge Saddles’.
- Once all of the strings are at the correct height, lock the saddles into place using the ‘Saddle lock Screw’.
Saddle lock Screw
The Saddle Lock Screws are fitted to either side of the bridge. When locked these screws prevent any vibration of the ‘Bridge Saddles’. Take care not to over tighten these screws.
Make sure that the Saddle lock screws are loosened before any ‘Bridge Saddle’ adjustments otherwise this may damage the bridge.
Gotoh GE103B-T
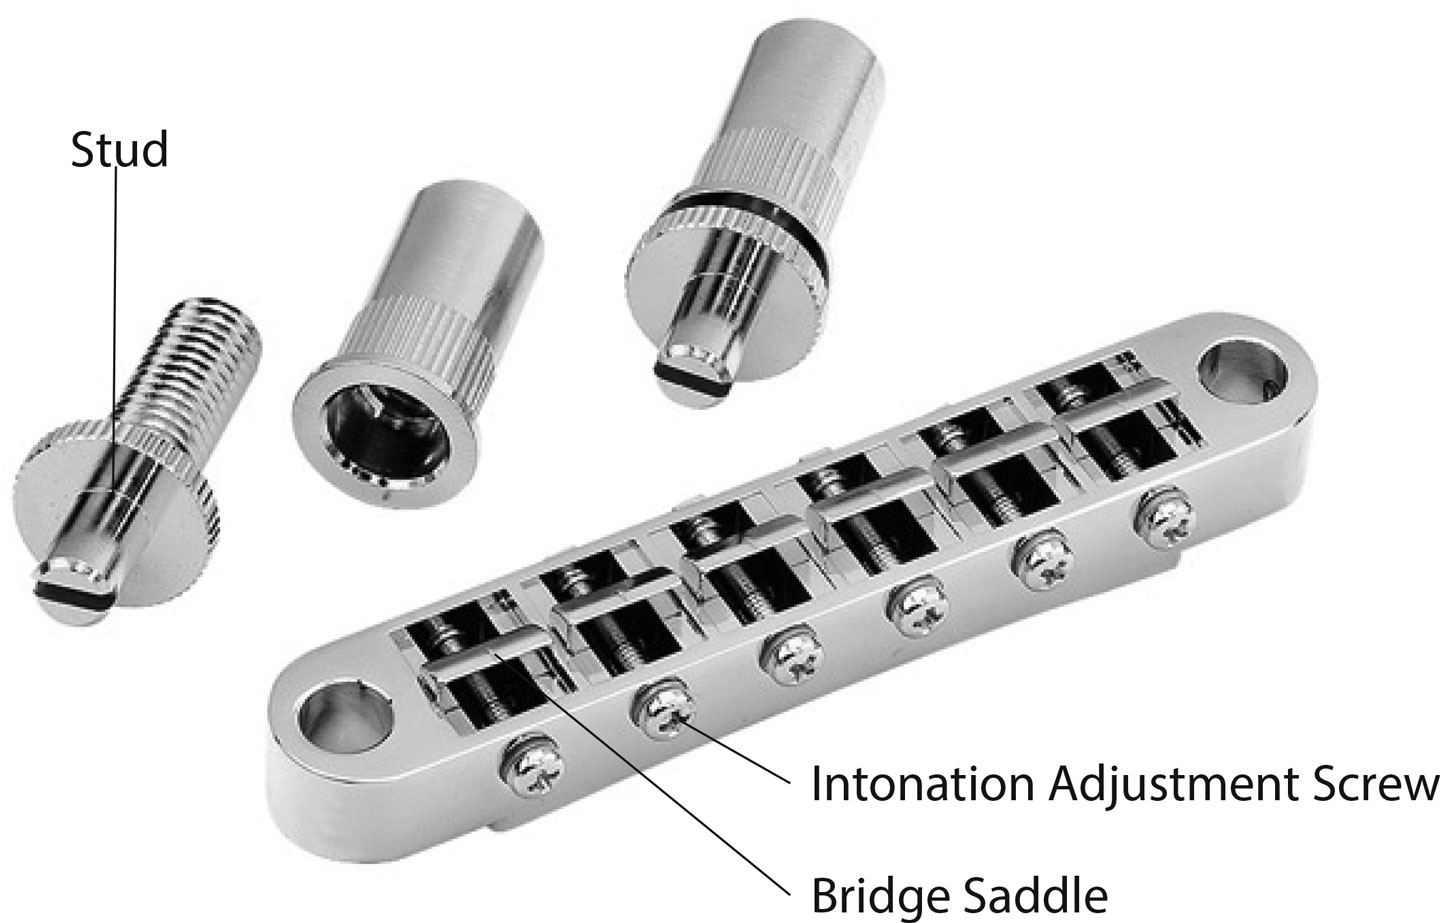
To remove the strings
- Loosen the strings and remove from the machine heads (use a wire cutter to remove any ‘windings’ at the top of the string).
- Pull out the strings through the string ferrules on the back of body. or Tailpiece.
Fitting new strings
- Insert the new string through the back of the body or Tailpiece.
- Ensure the string is seated correctly on the ‘Bridge Saddle’, insert the string into the Machine Head Post and tune as normal (see Gotoh MG-T and Hip Shot Grip-Lock Machine Head instructions).
Intonation Adjustment
Turn the ‘Intonation Adjust Screw’ by screw driver in order to move the saddles forward or backwards in order to adjust the intonation*.
To Adjust the String Height
The ‘Stud’ on either side of the Bridge can be turned with a suitable flat head screw driver, this raises or lowers the Bridge.
*See the ‘Neck, String and Pickup Adjustment’ section for instructions on how to set your intonation.
Gotoh H.A.P. (height adjustable post) machine head
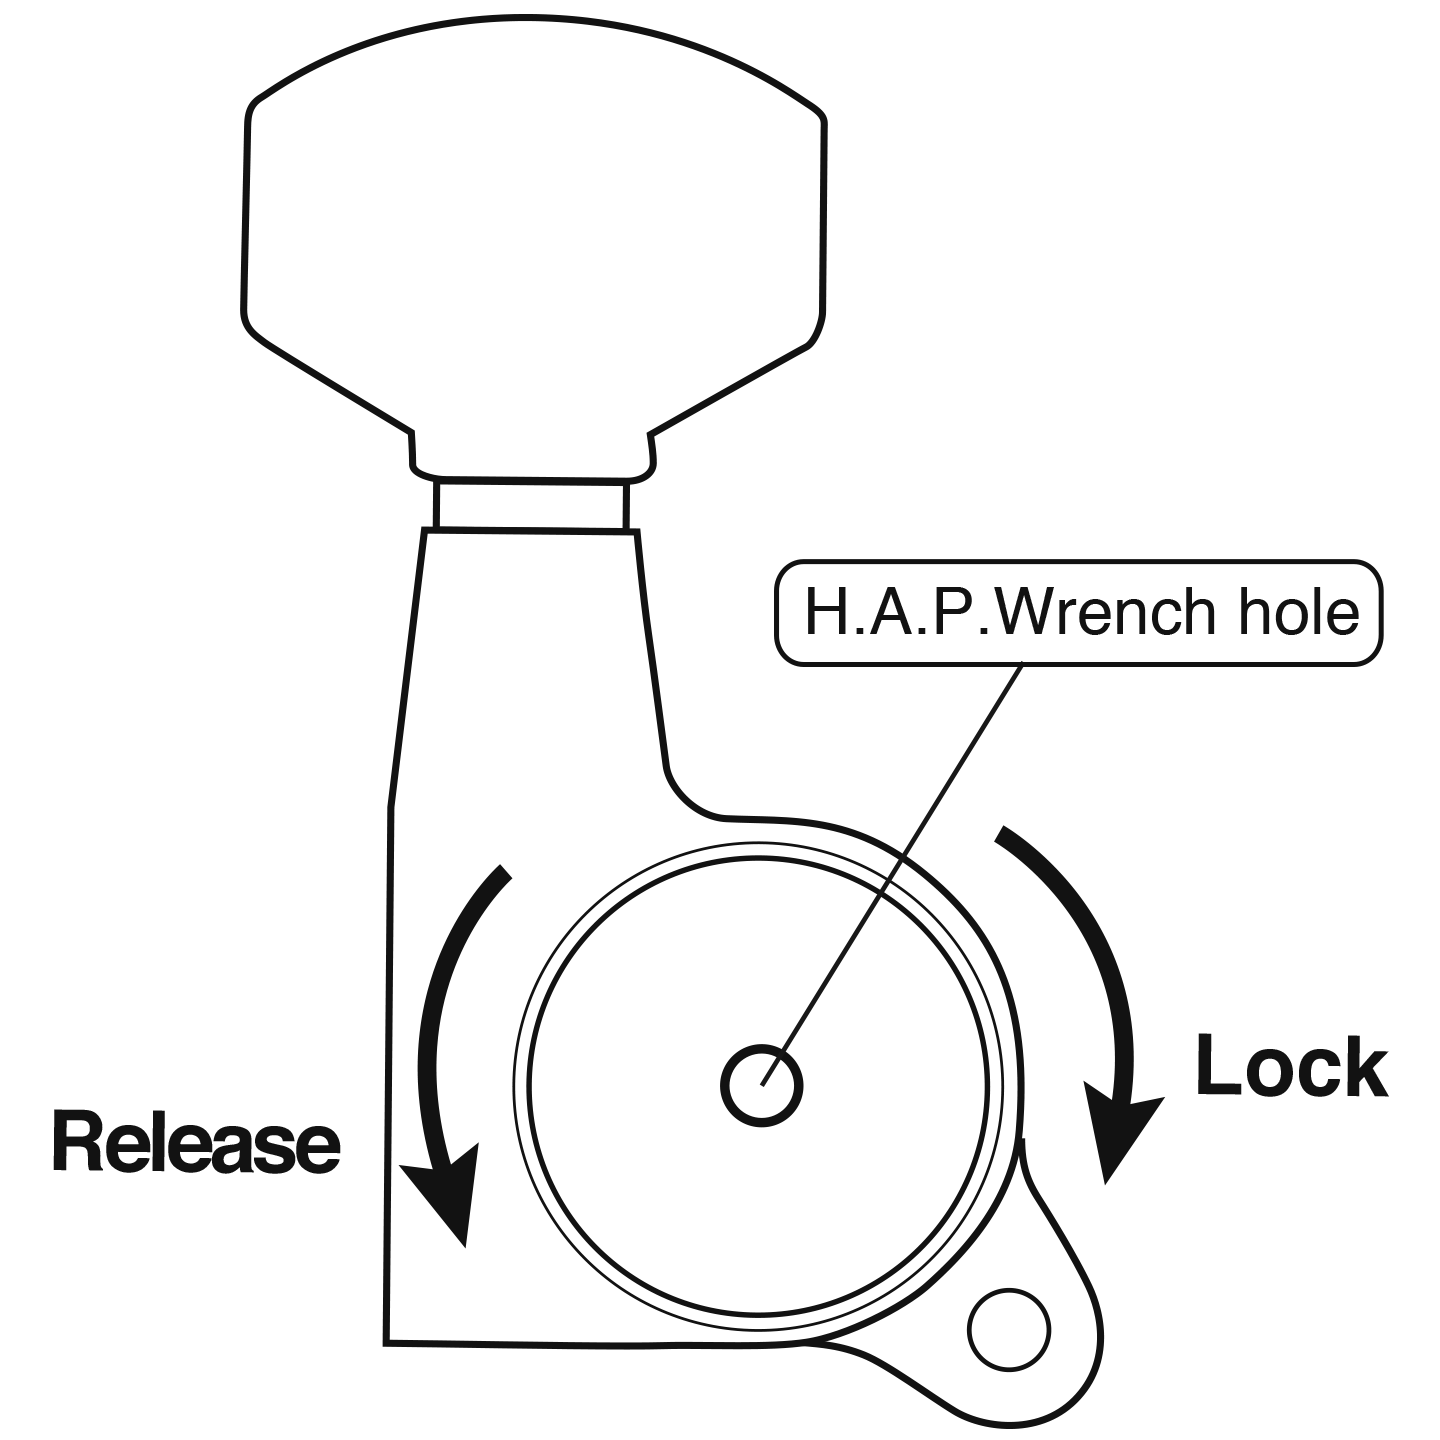
- Insert a 1.5 mm Allen Key (hex key) into the hole behind the machine head.
- On the bass side unlock the string post by turning the key in a clockwise direction. The height of the post can then be adjusted by turning the post by hand.
- When the desired break angle is achieved lock the post into position by turning the Allan key anti-clockwise. To unlock the posts on the treble side turn the Allan key anti-clockwise and to lock then turn clockwise.
- Lowering the post increases the string tension.
- Raising the post decreases the string tension.
Be aware that when the post is unlocked it cannot be tuned.
Also be aware that if the post is raised too much it can come off.
Do not unlock the posts when the strings are under tension.
Do not over tighten using the Allan key as this may cause damage.
Gotoh MG-T and Hipshot Grip-Lock locking machine heads
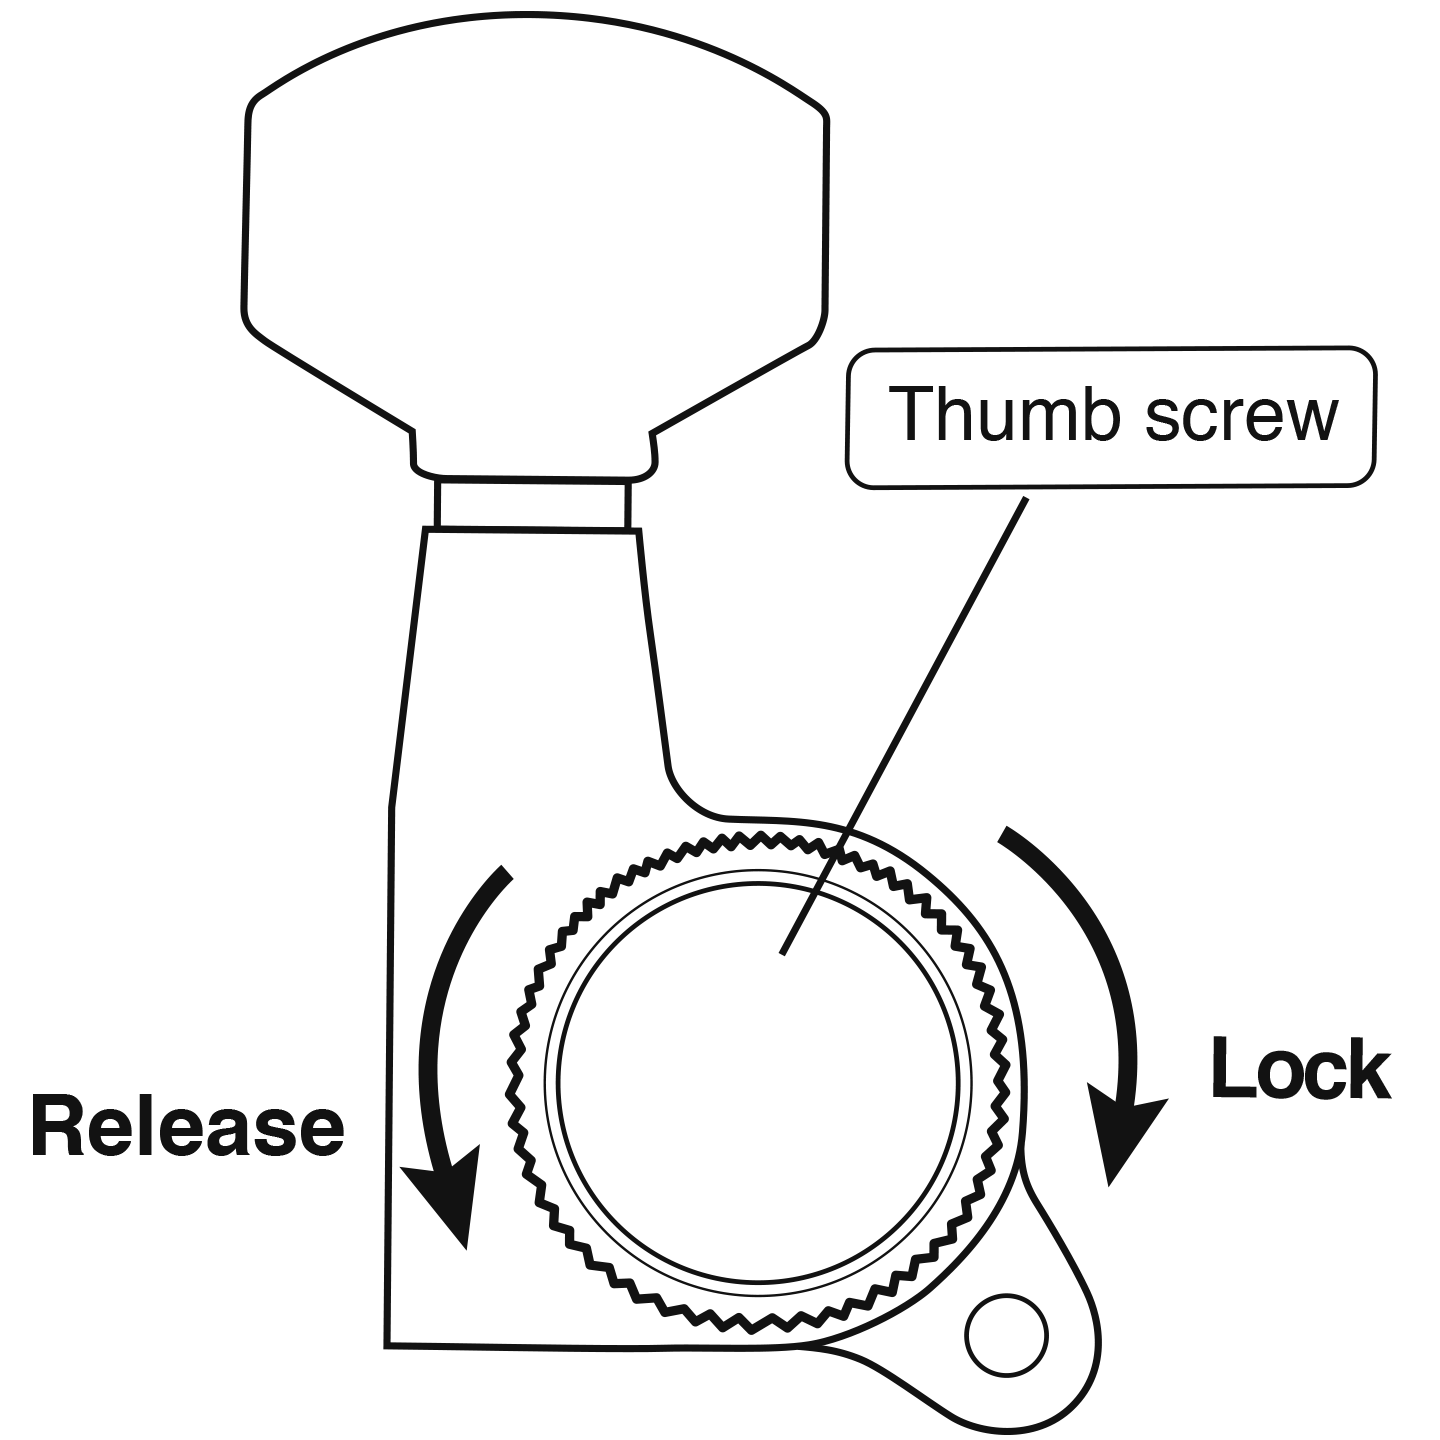
The Gotoh ‘MG-T’ and Hip Shot ‘Grip Lock’ machine heads simplify string changes by being able to lock the strings into the string posts before tuning, enabling a quick and easy operation.
Turn the thumb screw clockwise to lock the string into the tuning post.
Turn the thumb screw anti-clockwise to loosen the locking system and remove the string.
Do not loosen the string lock while the string is under tension.
Factory Setup & Action Specs.
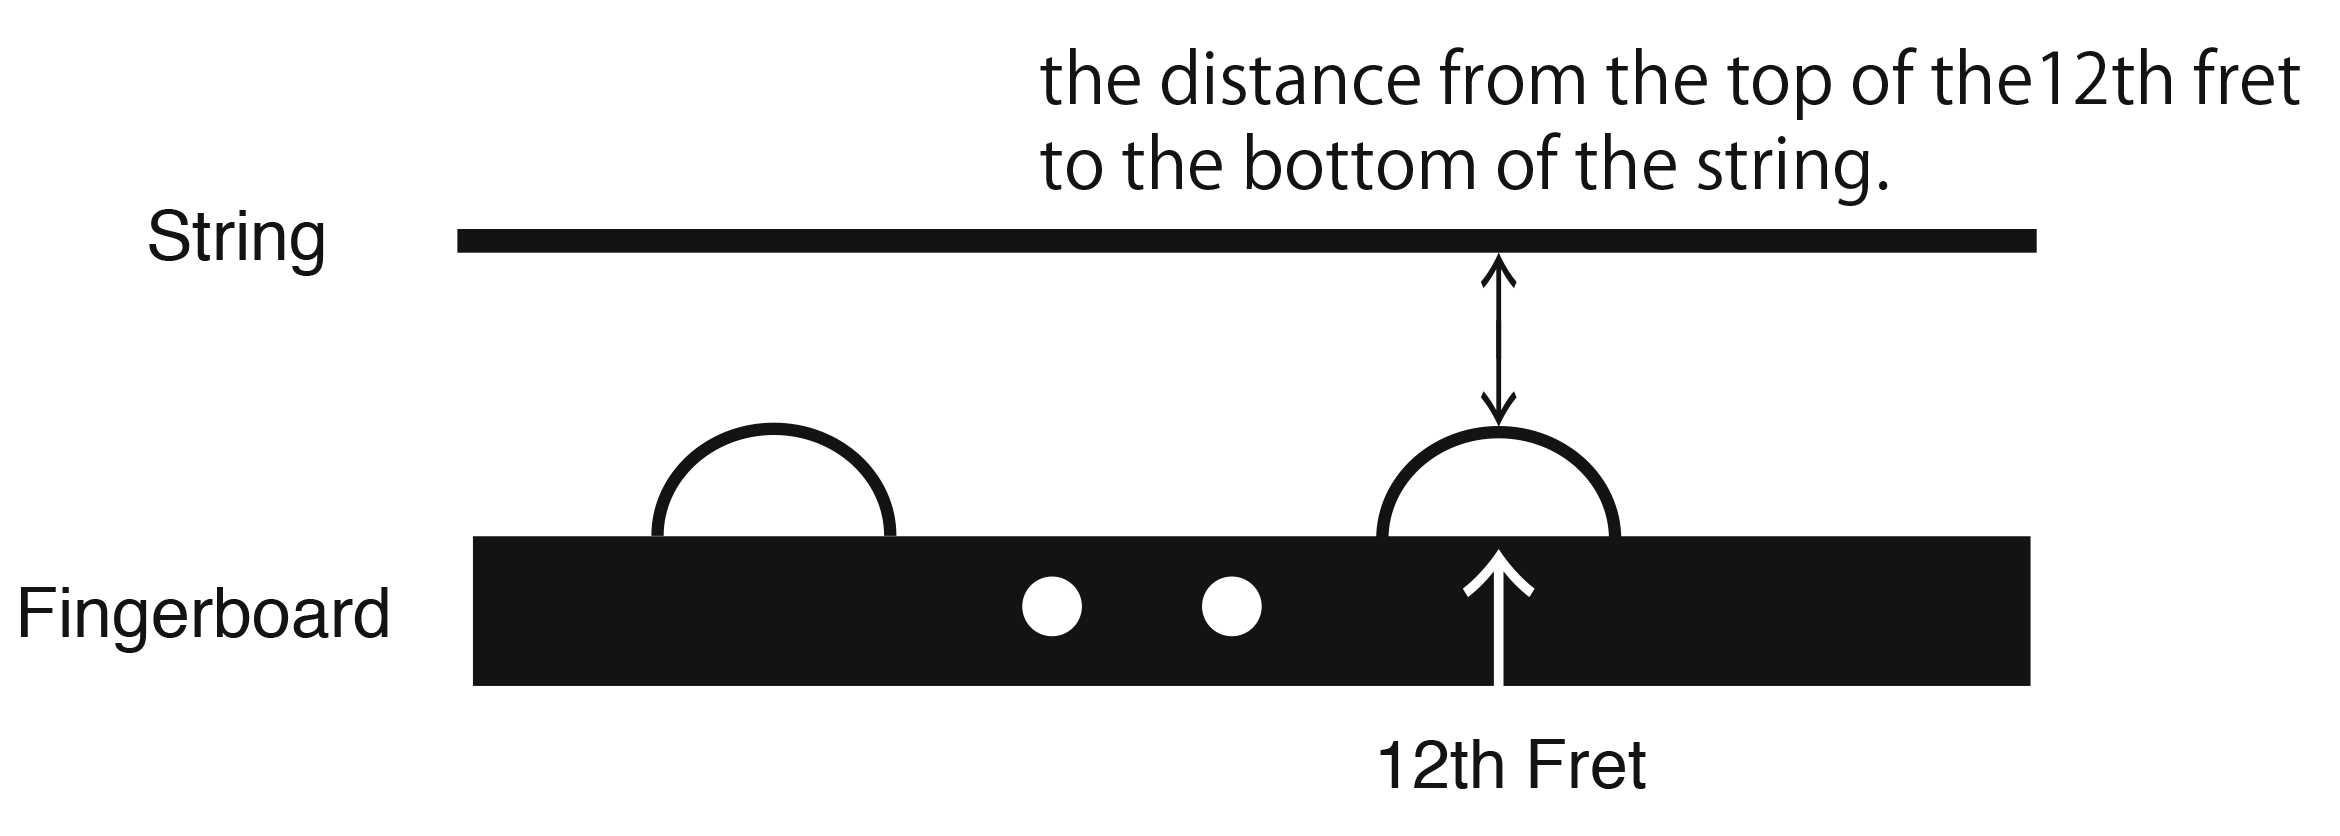
The Caparison factory setup specifications are listed below, including the gauge of string, tuning and action (string height) as measured from the top of the 12th fret to the bottom of the string.
Horus FX-AM
(Regular Tuning: E, B, G, D, A, E)
009, 011, 016, 024w, 032w, 042w
Action: 1st:1.2mm, 2nd: 1.2mm, 3rd: 1.3mm, 4th: 1.4mm, 5th: 1.5mm, 6th: 1.6mm
Dellinger II FX-AM
(C Standard: C, G, D#, A#, F, C)
010, 013, 017, 030w, 042w, 052w
Action: 1st: 1.2mm, 2nd: 1.3mm, 3rd: 1.4mm, 4th: 1.5mm, 5th: 1.6mm, 6th: 1.7mm
Dellinger7 FX-AM
(Regular+Low B: E, B, G, D, A, E, B)
009, 011, 016, 024w, 032w, 042w 052w
Action: 1st: 1.2mm, 2nd: 1.2mm, 3rd: 1.3mm, 4th: 1.4mm, 5th: 1.5mm, 6th: 1.6mm, 7th: 1.8mm
Brocken FX-WM
(Down A Standard: A, E, C, G, D, A)
013, 017, 030w, 042w, 052w, 060w
Action: 1st: 1.5mm, 2nd: 1.5mm, 3rd: 1.4mm, 4th: 1.5mm, 5th: 1.6mm, 6th: 1.8mm
Brocken7 FX-WM
(Down D Standard+A: D, A, F, C, G, D, A)
010, 013, 017, 030w, 042w, 052w, 060w
Action: 1st: 1.5mm, 2nd: 1.5mm, 3rd: 1.4mm, 4th: 1.5mm, 5th: 1.6mm, 6th: 1.8mm, 7th: 1.9mm
Brocken8 FX-WM
(D#, A#, F#, C#, G#, D#, A#, F)
009, 011, 016, 024w, 032w, 042w, 054w, 070w
Action: 1st: 1.5mm, 2nd: 1.5mm, 3rd: 1.4mm, 4th: 1.5mm, 5th: 1.6mm, 6th: 1.8mm, 7th: 1.9mm, 8th: 2.0mm
Dellinger-JSM
(Drop C: D, A, F, C, G, C)
010, 013, 017, 030w, 042w, 052w
Action: 1st: 1.2mm, 2nd: 1.3mm, 3rd: 1.4mm, 4th: 1.5mm, 5th: 1.6mm, 6th: 1.7mm
TAT Special FX ʻMetal Machineʼ
(Drop C: D, A, F, C, G, C)
010, 013, 017, 030w, 042w, 052w
Action: 1st string: 1.2mm / 6th: 1.7mm
Horus-M3, Horus-M3 CC,
Dellinger Prominence, Orbit FX, TAT Special FM
(Regular Tuning: E, B, G, D, A, E)
009, 011, 016, 024w, 032w, 042w
Action: 1st string: 1.2mm / 6th: 1.6mm
Delllinger Prominence-MJR
(D Standard: D, A, F, C, G, D)
010, 013, 017, 026w, 036w, 046w
Action: 1st string: 1.2mm / 6th: 1.7mm
Dellinger7 Prominence, TAT Special 7 FM
(Regular+Low B: E, B, G, D, A, E, B)
009, 011, 016, 024w, 032w, 042w 052w
Action: 1st string: 1.2mm / 7th: 1.8mm